Compose is becoming more and more popular in Android development and we are trying to create astonishing layouts with it. And even though Compose offers a lot of very configurable layouts, there are cases when it’s necessary to do a custom one.
Non-lazy layout
This blog should be about lazy layouts but there are not many differences between regular and custom ones. And I think to be able to understand the lazy one, it’s good to at least know how the simpler ones work.
Compose offers API to create a custom layout with function Layout:
@Composable
inline fun Layout(
    content: @Composable () -> Unit,
    modifier: Modifier = Modifier,
    measurePolicy: MeasurePolicy
) { … }
So when you want to create one, all you need to do is provide content, which is @Composable lambda (pretty similar to when you use any other slot API) and a modifier which is again the same as when you use other composable functions.
The more interesting part is the MeasurePolicy interface:
@Stable
fun interface MeasurePolicy {
    fun MeasureScope.measure(
        measurables: List,
        constraints: Constraints
    ): MeasureResult

    …
}
You should measure the content of your layout with it. As you can see, the measure function has two arguments:
measurablescorresponds to each child incontentlambda from thelayoutfunctionconstraintsbased on available space for layout and each child should respect it
So we have everything to start the measurement. And it is a three-step process:
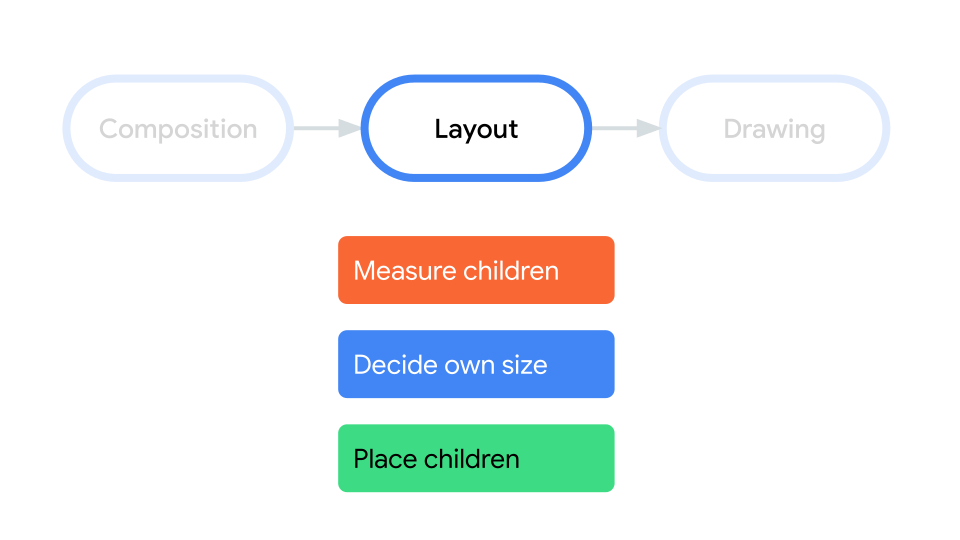
First, you need to measure all children. These children are provided via measurables and are measured with Measuraable.measure(Constraints). It returns Placeables, but before placing, you have to create a layout with some size, where you can place them. To do this, there is a function layout(width, height) { … }. And inside this lambda block, you can finally place your children. Just simply call the placeRelative(x, y)function and it’s done. You have just created your own custom layout.
There is a very simple example of our custom layout which behaves like Column:
@Composable
fun MyLayout(
    modifier: Modifier = Modifier,
    content: @Composable () -> Unit
) {
    Layout(content, modifier) { measurables, constraints ->
        val placeables = measurables.map { measurable ->
            measurable.measure(constraints)
        }


        layout(constraints.maxWidth, constraints.maxHeight) {
            var y = 0
            placeables.forEach { placeable ->
                placeable.placeRelative(0, y)
                y += placeable.height
            }
        }
    }
}
You can read more about it here.
Let’s get Lazy
Until now it was pretty simple, right? But in real-world scenarios, you have a lot of items, complicated item UI, scrolling etc. So when you use the non-lazy approach the initial time to draw everything will be long and every recomposition very expensive. So it’s time to get lazy. In our sample, we will just randomly generate items with X and Y coordinates and then place them according to these coordinates, so we will be able to see the laziness:
So instead of the Layout function, there is LazyLayout which provides everything you need. It looks different, but the basics are still the same.
@Composable
fun LazyLayout(
    itemProvider: LazyLayoutItemProvider,
    modifier: Modifier = Modifier,
    prefetchState: LazyLayoutPrefetchState? = null,
    measurePolicy: LazyLayoutMeasureScope.(Constraints) -> MeasureResult
)
LazyLayoutItemProvider
The interface only provides a total number of items and a composable function for each item.
@Stable
interface LazyLayoutItemProvider {
    val itemCount: Int

    @Composable
    fun Item(index: Int)

    fun getContentType(index: Int): Any? = null
    fun getKey(index: Int): Any = getDefaultLazyLayoutKey(index)
    val keyToIndexMap: Map get() = emptyMap()
}
As you can see, there are other functions, but these are only optimizations and since this article is only about basics, we will keep the default implementation.
Before creating the item provider class we need to write some other code.
ListItem
Data class which wraps the coordinates of each item to be able to place it in the correct position.
data class ListItem(
    val x: Int,
    val y: Int
)
ViewBoundaries
Data class represents available area where to draw items
data class ViewBoundaries(
    val fromX: Int,
    val toX: Int,
    val fromY: Int,
    val toY: Int
)
LazyListItemContent
Each ListItem requires some composable content. So let’s wrap it in the class.
typealias ComposableItemContent = @Composable (ListItem) -> Unit

data class LazyLayoutItemContent(
    val item: ListItem,
    val itemContent: ComposableItemContent
)
The ComposableItemContent is just typealias because we will need it in the next part to create DSL.
Now we are finally able to create the LazyLayoutItemProvider class.
class ItemProvider(
    private val itemsState: State>
) : LazyLayoutItemProvider {

    override val itemCount
        get() = itemsState.value.size

    @Composable
    override fun Item(index: Int) {
        val item = itemsState.value.getOrNull(index)
        item?.itemContent?.invoke(item.item)
    }

    fun getItemIndexesInRange(boundaries: ViewBoundaries): List {
        val result = mutableListOf()

        itemsState.value.forEachIndexed { index, itemContent ->
            val listItem = itemContent.item
            if (listItem.x in boundaries.fromX..boundaries.toX &&
                listItem.y in boundaries.fromY..boundaries.toY
            ) {
                result.add(index)
            }
        }

        return result
    }

    fun getItem(index: Int): ListItem? {
        return itemsState.value.getOrNull(index)?.item
    }
}
With the LazyLayoutItemContent class which wraps the item’s data and composable content it’s pretty simple. As itemCount just returns the size of the list and as content returns just the content of the item.
But we have to store the list of LazyLayoutItemContent as the State to be able to trigger recomposition and change the content of the layout. Otherwise, the layout would not react to any item changes.
Next, we have two of our own methods, first the getItemIndexesInRange(), which returns items in boundaries. This implementation is very simple, but works just fine. The second one is getItem() which only returns a ListItem from the list by index. We will need them later.
Creating ItemProvider and DSL
You surely can ask how to create an instance of the ItemProvider, because we all are used to the nice LazyColumn/LazyRow DSL, where we don’t have to care about some item providers. And the answer is pretty simple. We will create our own DSL to achieve almost the same usage.
Let’s design the API for our custom layout:
@Composable
fun CustomLazyLayout(
    modifier: Modifier = Modifier,
    state: LazyLayoutState = rememberLazyLayoutState(),
    content: CustomLazyListScope.() -> Unit
) { … }
interface CustomLazyListScope {
fun items(items: List, itemContent: ComposableItemContent)
}So the usage will be like this:
CustomLazyLayout(
    state = lazyLayoutState,
    modifier = Modifier.fillMaxSize(),
) {
    items(screenState.items) { item ->
        Text(
            text = "X: ${item.x}\nY: ${item.y}",
            color = Color.White,
            modifier = Modifier
                .clip(RoundedCornerShape(24.dp))
                .background(MaterialTheme.colorScheme.primary)
                .padding(12.dp)
        )
    }
}
Now let’s move from design to implementation.
First of all, we need implementation of CustomLazyListScope. It should add items to some list on each call of items(...) function. Which means something like this:
class CustomLazyListScopeImpl() : CustomLazyListScope {

    private val _items = mutableListOf()
    val items: List = _items

    override fun items(items: List, itemContent: ComposableItemContent) {
        items.forEach { _items.add(LazyLayoutItemContent(it, itemContent)) }
    }
}
So now we are able to transform items created from our DSL to a list of LazyLayoutItemContent. But we are still missing creating an ItemProvider instance. And now it gets a little bit complicated.
@Composable
fun rememberItemProvider(customLazyListScope: CustomLazyListScope.() -> Unit): ItemProvider {
    val customLazyListScopeState = remember { mutableStateOf(customLazyListScope) }.apply {
        value = customLazyListScope
    }

    return remember {
        ItemProvider(
            derivedStateOf {
                val layoutScope = CustomLazyListScopeImpl().apply(customLazyListScopeState.value)
                layoutScope.items
            }
        )
    }
}
There is all the magic about how to transform a DSL to ItemProvider. Firstly we create MutableState which holds CustomLazyListScope.() -> Unit` (our DSL). And based on this we apply DSL on CustomLazyListScopeImpl so we get items and create ItemProvider.
I suppose it’s obvious why mutableStateOf(customLazyListScope) is wrapped into a remember block. It’s the same as the return’s outer part. We want to create one derivedStateOf and it should always be wrapped into the remember block. And the derivedStateOf is used because we want to transform some state into another state (the one in ItemProvider).
So now the recomposition on item changes will work correctly.
LazyLayoutState and scrolling
When you are building a custom lazy layout, you have to handle scrolling by yourself. To achieve this, some state which holds a scroll position is necessary. We also need to get the boundaries which represent what area is visible in order to be able to draw only needed items.
So now let's create the state.
@Composable
fun rememberLazyLayoutState(): LazyLayoutState {
    return remember { LazyLayoutState() }
}


@Stable
class LazyLayoutState {

    private val _offsetState = mutableStateOf(IntOffset(0, 0))
    val offsetState = _offsetState

    fun onDrag(offset: IntOffset) {
        val x = (_offsetState.value.x - offset.x).coerceAtLeast(0)
        val y = (_offsetState.value.y - offset.y).coerceAtLeast(0)
        _offsetState.value = IntOffset(x, y)
    }

    fun getBoundaries(
        constraints: Constraints,
        threshold: Int = 500
    ): ViewBoundaries {
        return ViewBoundaries(
            fromX = offsetState.value.x - threshold,
            toX = constraints.maxWidth + offsetState.value.x + threshold,
            fromY = offsetState.value.y - threshold,
            toY = constraints.maxHeight + offsetState.value.y + threshold
        )
    }
}
As we can see, our state has an offset state, which represents scroll position. onDrag method changes this state and method getBoundaries returns the area based on scroll position (offset) and constraints of the layout.
Now we need to update this state from our layout. To do this, we will create a simple extension on the Modifier.
private fun Modifier.lazyLayoutPointerInput(state: LazyLayoutState): Modifier {
    return pointerInput(Unit) {
        detectDragGestures { change, dragAmount ->
            change.consume()
            state.onDrag(IntOffset(dragAmount.x.toInt(), dragAmount.y.toInt()))
        }
    }
}
This only updates the scroll position in state. So we will be able to place only the items we need and place them in the correct position.
Measuring and placing
Now we can finally create a body of our CustomLazyLayout function. First, we need to create an instance of the item provider and then we can use the LazyLayout API to measure and place items.
@Composable
fun CustomLazyLayout(
    modifier: Modifier = Modifier,
    state: LazyLayoutState = rememberLazyLayoutState(),
    content: CustomLazyListScope.() -> Unit
) {
    val itemProvider = rememberItemProvider(content)

    LazyLayout(
        modifier = modifier
            .clipToBounds()
            .lazyLayoutPointerInput(state),
        itemProvider = itemProvider,
    ) { constraints ->
          …
    }
}
As you can see, we need to apply the clipToBounds modifier so the layout is correctly sized inside bounds and then we apply our lazyLayoutPointerInput from the previous part.
Now let's measure the items. In comparison with the non-lazy layout, we can measure items by index. So first we need indexes of items in boundaries.
Luckily we can get boundaries from our state and the item provider can return these indexes.
val boundaries = state.getBoundaries(constraints)
val indexes = itemProvider.getItemIndexesInRange(boundaries)
Finally we are able to measure items by these indexes.
val indexesWithPlaceables = indexes.associateWith {
        measure(it, Constraints())
}
Similarly as in the non-lazy one, we have to create a layout and place items inside it. But first, let's create a function to place individual items.
private fun Placeable.PlacementScope.placeItem(
    state: LazyLayoutState,
    listItem: ListItem,
    placeables: List
) {
    val xPosition = listItem.x - state.offsetState.value.x
    val yPosition = listItem.y - state.offsetState.value.y

    placeables.forEach { placeable ->
        placeable.placeRelative(xPosition, yPosition)
    }
}
During this placing, the item position is calculated based on the state and scroll position (offset). So the items are placed correctly.
Now we have everything to create this layout and place items.
layout(constraints.maxWidth, constraints.maxHeight) {
    indexesWithPlaceables.forEach { (index, placeables) ->
        val item = itemProvider.getItem(index)
        item?.let { placeItem(state, item, placeables) }
    }
}
And we are done. Our final function’s body looks like this.
@Composable
fun CustomLazyLayout(
    modifier: Modifier = Modifier,
    state: LazyLayoutState = rememberLazyLayoutState(),
    content: CustomLazyListScope.() -> Unit
) {
    val itemProvider = rememberItemProvider(content)

    LazyLayout(
        modifier = modifier
            .clipToBounds()
            .lazyLayoutPointerInput(state),
        itemProvider = itemProvider,
    ) { constraints ->
        val boundaries = state.getBoundaries(constraints)
        val indexes = itemProvider.getItemIndexesInRange(boundaries)

        val indexesWithPlaceables = indexes.associateWith {
            measure(it, Constraints())
        }

        layout(constraints.maxWidth, constraints.maxHeight) {
            indexesWithPlaceables.forEach { (index, placeables) ->
                val item = itemProvider.getItem(index)
                item?.let { placeItem(state, item, placeables) }
            }
        }
    }
}
Conclusion
We have created a simple lazy layout which draws only visible items. Compared with a non-lazy solution, this solution is much more complicated and requires us to implement many features ourselves. On the other hand, it allows us to create complex layouts with great performance.
You can check the final code on Github.