Maybe you've already heard of them, maybe you have no idea what they are. Let me introduce what passkeys are, how they can significantly simplify user authentication while improving not only the security of your web application's authentication. We'll look at how the whole thing works from the outside and the inside. A fully functional demo with complete source code awaits you. We'll see where passkeys are heading and what new things they'll soon be able to do. I'll round it all off with my own experience in an effort to capture the essentials. A proper cup of coffee will definitely come in handy, so let's get to it!
Let's at least get closer to an answer. According to haveibeenpwned.com, my email address appears in 24 data breaches. In many of them together with a password and other sensitive data. We can be angry at the imperfect implementation of a given service, but the world of security is ever-changing, and what counted as secure a few years ago can today serve as a false sense of security. It's a world full of probabilities and calculated risks, where we rely on the hope that not even the most powerful computer will be able to break our application's security layer for x years.
Go ahead and check how long it would take to break a password similar to yours — the password managers Bitwarden or NordPass will give you an estimate. Of course you have to take it with a grain of salt, but for a rough idea it's not bad at all.
The problem is that even if you choose a password that would take so long to crack that the Sun will have long burned out by then, you can't prevent an attacker from finding another way to gain access to your account. For example, you might become the victim of a phishing attack and hand the password to the attacker yourself by mistake. Believing you're logging into your familiar old app, you fill in your credentials and only notice the slightly different URL when it's already too late.
However the attacker might get to the password, it's better to design the security layer so that even a leaked password won't break access to your account. How? Precisely thanks to multi-factor authentication of the user, specifically as OWASP mentions:
"Multi-factor authentication (MFA) is by far the best defense against the majority of password-related attacks, including brute-force attacks, with analysis by Microsoft suggesting that it would have stopped 99.9% of account compromises. As such, it should be implemented wherever possible; however, depending on the audience of the application, it may not be practical or feasible to enforce the use of MFA, however with modern browsers and mobile devices now supporting FIDO2 Passkeys and other forms of MFA, it is attainable for most use cases."
What is MFA? MFA is verifying the user with at least two **factors**, which we can divide into three main categories: - something you **_know_**: a password, PIN, security question, … - something you **_have_**: - a smartphone: - to receive a one-time (SMS) code (OTP – one-time-password) - to generate a time-based one-time code using an app like Google Authenticator (TOTP – time-based one-time-password) - a USB security key - something you **_are_**: biometric verification (fingerprint, face recognition)
In the quote above, OWASP mentions exactly FIDO2 passkeys as a possible MFA solution that is more user-friendly than existing methods.
So what are passkeys?
Simply put, it's an easier and safer way to authenticate a user. Instead of a password, you can use, for example, a fingerprint or face recognition, depending on the type of authenticator your device supports.
After all, try it yourself, here is a fully functional demo through which you can create a passkey and then log back into the app with it:
Whatever type of authenticator you chose during login in the demo, in the background a digital signature was created, in short:
The authenticator generates a cryptographically linked key pair.
The private key signs a challenge generated by your server.
The private key stays located in the authenticator (this applies only to so-called device-bound passkeys, discussed in more detail later).
The authenticator returns a result containing, among other things, the public key and the signature, i.e. a public-key credential.
The result from the authenticator is sent to your server, where the signature is verified using the public key.
We call such a key pair a passkey. You may also often come across FIDO2 passkeys. It's just a more formal term referring to the same thing. FIDO2 (Fast IDentity Online 2) is a shared project between the FIDO Alliance and W3C (World Wide Web Consortium) with the main goal of creating a new set of secure standards for verifying user identity on the web. Instead of authenticating the user with a user-created password, the authenticator creates a passkey.
FIDO2 has two basic components:
Client to Authenticator Protocol 2 (CTAP2) – a communication protocol between a cryptographic authenticator (such as FaceID, TouchID, or a hardware security key) and a client (e.g. a user agent).
W3C Web Authentication (WebAuthn) – an API available in the browser through which to initialize the creation and use of such a passkey.
The WebAuthn API currently offers "only" two methods:
navigator.credentials.create(...): Creates a passkey during the so-called attestation ceremony.
navigator.credentials.get(...): Gets a passkey during the so-called assertion ceremony.
The combination of parameters they accept is really large. You can find the W3C WebAuthn specification here, it's covered more accessibly by MDN or Google Developers.
How to create a new passkey?
By calling the navigator.credentials.create(...) method we create a new passkey, through a process called the attestation ceremony:
WebAuthn Attestation ceremony – An example of creating a synced passkey with platform authenticator.
A more detailed process of creating a passkey:
The client (relying party) sends an API request to the server with a username.
The server generates a challenge together with other required parameters:
- `pubKeyCredParams` (`COSEAlgorithmIdentifier`) - An array of asymmetric algorithms for creating a signature that your server can process. - To cover most authenticators, it's good to provide at least: RS256 (-257), EdDSA (-8), ES256 (-7). This covers Apple, Android, Windows 10 & 11 and security keys, [more here](https://www.corbado.com/blog/webauthn-pubkeycredparams-credentialpublickey#41-which-cose-algorithms-are-relevant-for-webauthn). The complete list of available algorithms [here](https://www.iana.org/assignments/cose/cose.xhtml#algorithms).
💡
If you request the use of an algorithm that a given authenticator doesn't support, you'll get this error, which isn't easy to reason about after the fact: DOMException: The operation either timed out or was not allowed. See: https://www.w3.org/TR/webauthn-2/#sctn-privacy-considerations-client.
- `rp` (_relying party_): The scope defined by your application's domain (i.e. the app that calls the WebAuthn API) within which the created passkeys can be used. - `user`: - `id`: Base64 URL format - `name`: username, e.g. an email - `displayName`: the user's name - `challenge`: Base64 URL format
At the same time the server generates a session ID (e.g. as a server-side cookie). Under this ID it stores in the database the generated challenge and other data that will be needed when verifying the authenticator's result.
The client converts the values from Base64 URL to a TypedArray and sends the whole structure into navigator.credentials.create:
Based on the session ID, the server finds the expected challenge and other stored data in the database. It checks whether the session hasn't expired and validates the AuthenticatorAttestationResponse.
From experience, I can say that parsing the AuthenticatorAttestationResponse is not easy at all. For instance, you have to deal with decoding the CBOR format – a binary data representation you can think of as JSON but for communicating with authenticators – and then meet all the conditions for correct validation. That's why it may be more appropriate to use some proven library that does it for us, e.g. SimpleWebAuthn.
💡
WebAuthn SDK **In the demo I use exactly [SimpleWebAuthn](https://github.com/MasterKale/SimpleWebAuthn/tree/master), both on the client and the server.** However there are many alternatives, including libraries in other languages: [awesome-webauthn](https://github.com/yackermann/awesome-webauthn).
🧑💻
Source code Creating a passkey (registration): [server](https://github.com/cermakjiri/with-webauthn/tree/452b5aa4b0377b60ebd89b28cc9f990af75be51c/examples/webauthn-default/src/pages/api/webauthn/register) and [client](https://github.com/cermakjiri/with-webauthn/tree/452b5aa4b0377b60ebd89b28cc9f990af75be51c/examples/webauthn-default/src/components/WebAuthnDefaultExamplePage/DefaultExample/RegisterWithPasskeyPage).
That is, the relying party sets the scope within which passkeys can be used.
This scope is given by the domain name of the relying party, i.e. the web application that performed authentication via the WebAuthn API.
This parameter is set by rpId and is subject to the following constraints:
rpId doesn't include the origin scheme (i.e. https://) or the port.
If we have the relying party hosted at https://myapp.example.com, a valid rpId is myapp.example.com (default) or example.com, but not foo.myapp.example.com, nor com.
So passkeys created with rpId: example.com can be used on other subdomains, e.g. a.example.com, b.example.com.
The username doesn't have to be an email, but it can be a suitable choice. If you have multiple authentication providers, then the email can serve to link them. Or also because, in combination with autocomplete="email" and a feature of a service like iCloud+ that creates an anonymous email and forwards messages to the user's original email. This can help simplify and secure the registration process for the user (in a data breach, only the alias leaks, not the real email address).
If we want to prevent creating multiple passkeys for a given service on one authenticator for the same user (which we probably do), we need to fill excludeCredentials with existing passkeys that we've saved to the database.
For security reasons it's important that your relying party server temporarily stores the generated challenge until the registration process is complete, and uses the correct challenge during verification (just like when using a passkey, i.e. during the assertion ceremony).
SimpleWebAuthn suggests a possible solution in its documentation. A similar solution is also implemented in the demo (including OWASP security recommendations for setting a server-side cookie).
How to use an existing passkey?
By calling the navigator.credentials.get(...) method we obtain existing passkeys, through a process called the assertion ceremony. I'll illustrate three variations of use here:
Logging the user in to the application.
Verifying the user in an application in which they are already logged in (i.e. e.g. before performing a sensitive action).
Logging into the application using so-called passkeys autofill.
Logging the user into the application
Requires no username or list of existing passkeys, just a challenge generated by your server, and the browser offers a list of all passkeys for the current domain – we call such passkeys discoverable credentials (in earlier terminology resident keys):
Assertion ceremony: Select from several discoverable passkeys, authenticate with platform authenticator.**The process of using a passkey:** 1. The server generates a `challenge`:
2. Similarly to creating a passkey, the server generates a session ID (e.g. as a server-side cookie). Under this ID it stores in the database the generated `challenge` and other data that will be needed when verifying the authenticator's result.
The client converts the challenge to a TypedArray and calls the get method:
The user is shown a list of all available passkeys for the given service:List of discoverable credentials
🧑💻
Source code Login: [server](https://github.com/cermakjiri/with-webauthn/tree/452b5aa4b0377b60ebd89b28cc9f990af75be51c/examples/webauthn-default/src/pages/api/webauthn/login) and [client](https://github.com/cermakjiri/with-webauthn/tree/main/examples/webauthn-default/src/components/WebAuthnDefaultExamplePage/DefaultExample/LoginWithPasskeyPage).
Verifying a logged-in user:
Before performing a sensitive action, we specify the passkey under which the user is already logged in – we require re-verification of the user:
Assertion ceremony: Restrict available passkeys by filling allowCredentials property for specific user (username).1. Besides the `challenge`, the server also returns the given passkey (`allowCredentials`) – i.e. the passkey `id` and the types (`transports`) by which the given authenticator can be connected:
2. Again, the server generates a session ID (e.g. as a server-side cookie). Under this ID it stores in the database the generated `challenge` and other data that will be needed when verifying the authenticator's result. 3. Since it's a sensitive action, we set `userVerification: 'required'`:
**And even more important is to check the `assertionResponse`** that the authenticator actually performed user verification. See the chapter [What is user presence & user verification](#user-presence-user-verification)? 4. The user is shown verification for the given passkey directly:
🧑💻
Source code Removing a passkey with re-verification of the user: [server](https://github.com/cermakjiri/with-webauthn/tree/452b5aa4b0377b60ebd89b28cc9f990af75be51c/examples/webauthn-default/src/pages/api/webauthn/remove) and [client](https://github.com/cermakjiri/with-webauthn/blob/452b5aa4b0377b60ebd89b28cc9f990af75be51c/examples/webauthn-default/src/components/WebAuthnDefaultExamplePage/DefaultExample/PasskeysPage/hooks/useRemovePasskey.ts).
Passkey autofill:
Or conditional mediation (conditional UI) is a way to improve the UX of logging in with passkeys. Similarly to the first example of using a passkey, the user is offered all available (discoverable) passkeys, but in this case within select input options:
Assertion ceremony (conditional mediation): Select from available passkeys in select options.Passkeys autofill1. This time the server returns no `allowCredentials`:
2. As every time, the server creates a session ID.
The client must specify the mediation parameter:
At the same time it must set the autocomplete="webauthn ..." attribute on the given HTML element:
🧑💻
Source code Passkeys autofill: [server](https://github.com/cermakjiri/with-webauthn/tree/452b5aa4b0377b60ebd89b28cc9f990af75be51c/examples/webauthn-default/src/pages/api/webauthn/login) and [client](https://github.com/cermakjiri/with-webauthn/blob/452b5aa4b0377b60ebd89b28cc9f990af75be51c/examples/webauthn-default/src/components/WebAuthnDefaultExamplePage/DefaultExample/LoginWithPasskeyPage/hooks/useConditionalMediation.ts).
Important notes on using a passkey:
The call to navigator.credentials.get(...) must happen as soon as possible after the page loads – before the user clicks into the given input.
Within passkeys autofill, navigator.credentials.get(...) is also used. In this case, however, it returns a Promise that reaches the resolved state only when the user selects one of the offered passkeys.
Which also means that if the user selects no passkey and clicks the log-in button, the app calls navigator.credentials.get(...) again and you get the error: OperationError: A request is already pending. It's therefore necessary to first cancel the previous request using the AbortController API:
userHandle in the assertionResponse corresponds to the user ID generated during the attestation ceremony (when creating the passkey) – MDN docs. It can come in handy for simplifying the login process.
The user ID is nullable, but for discoverable credentials it must always be defined.
Types of authenticators
We divide authenticators into groups mainly by:
Type of communication: how they connect to the user's device.
Storage capability: whether the authenticator allows storing the created private passkey key or not.
1. Dividing authenticators by type of communication
The current version of the WebAuthn API can communicate with a whole range of cryptographic authenticators, which we divide into:
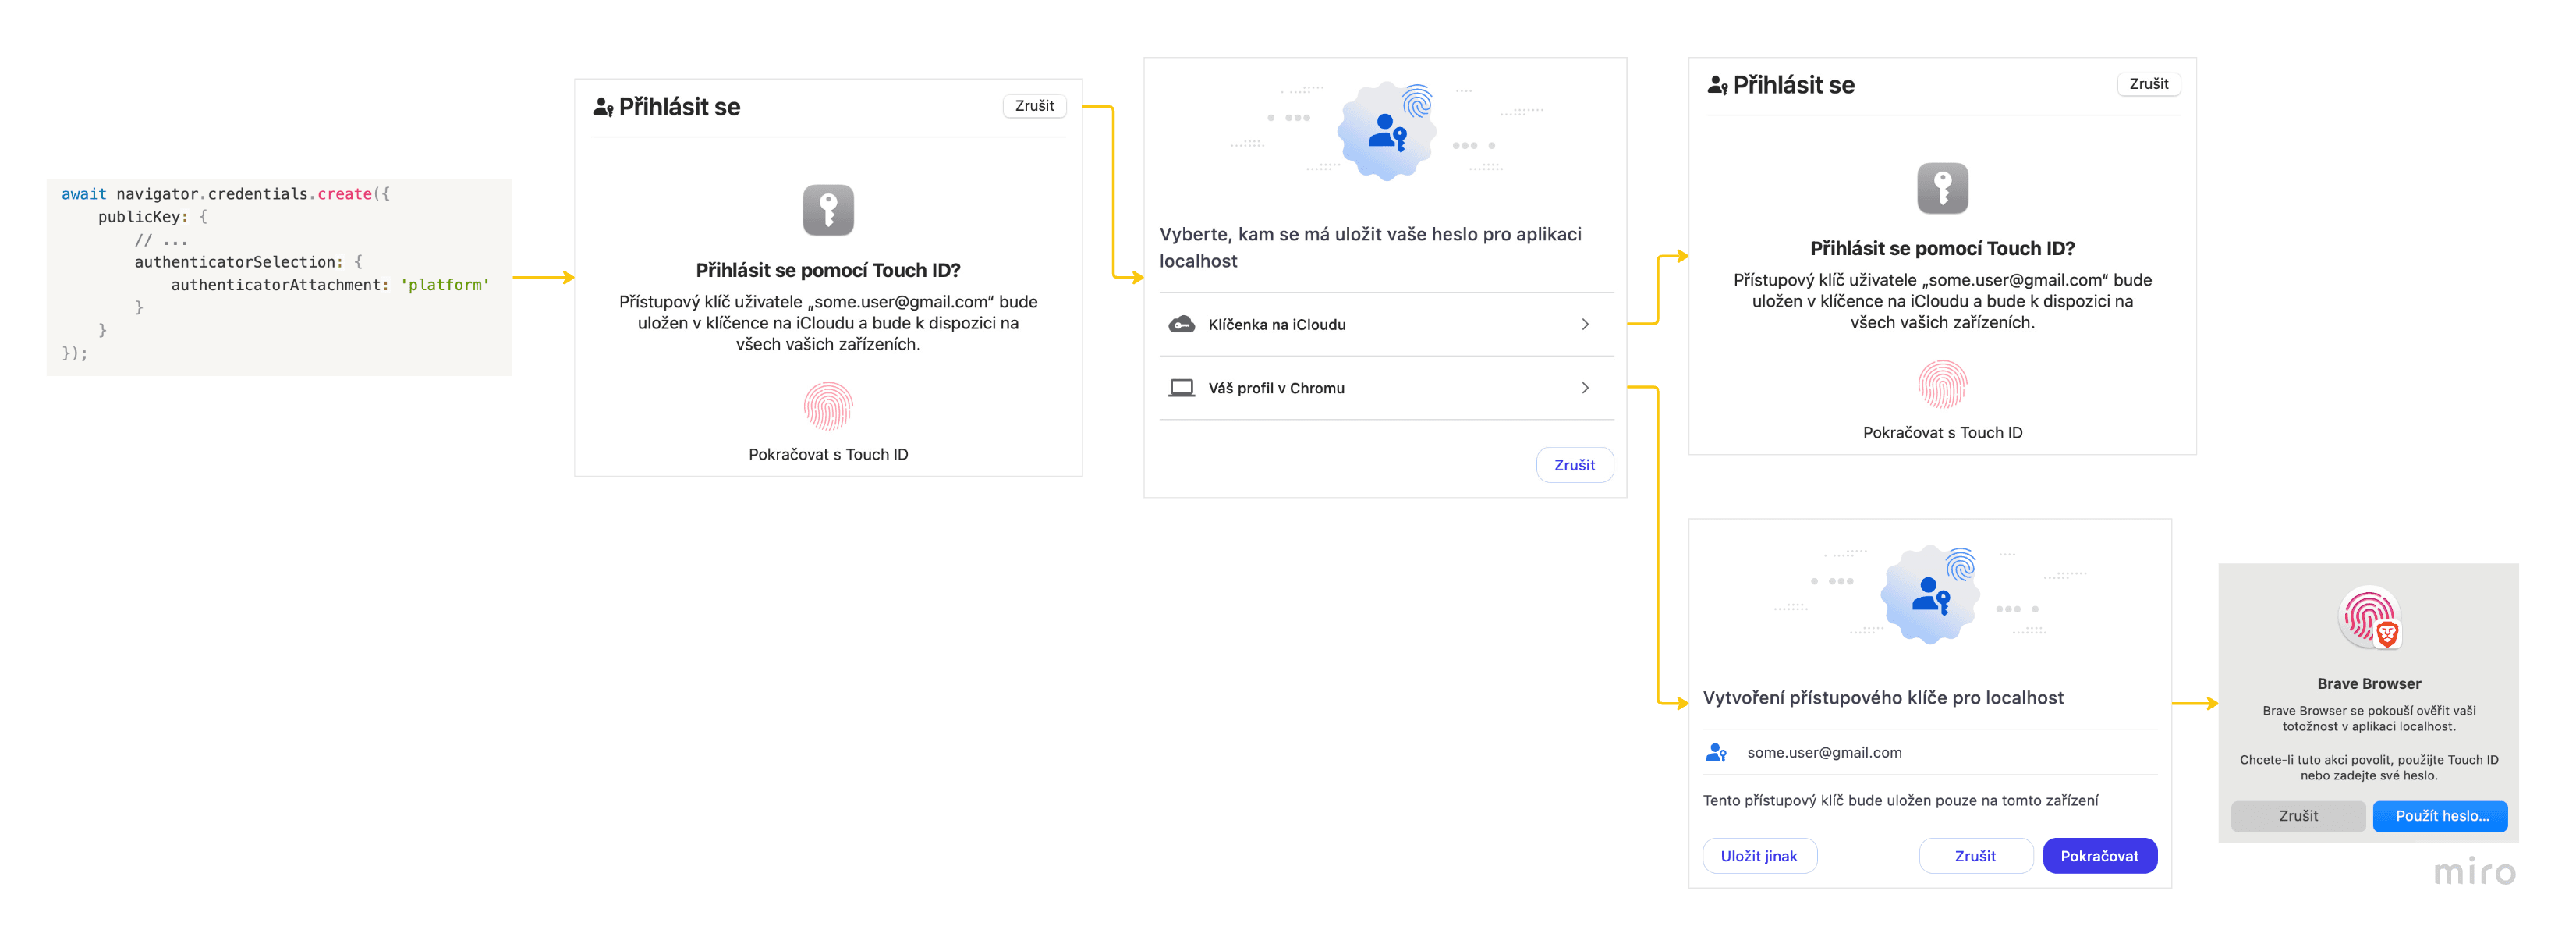
Platform authenticators: Located in the device: biometric sensors, PIN, pattern.
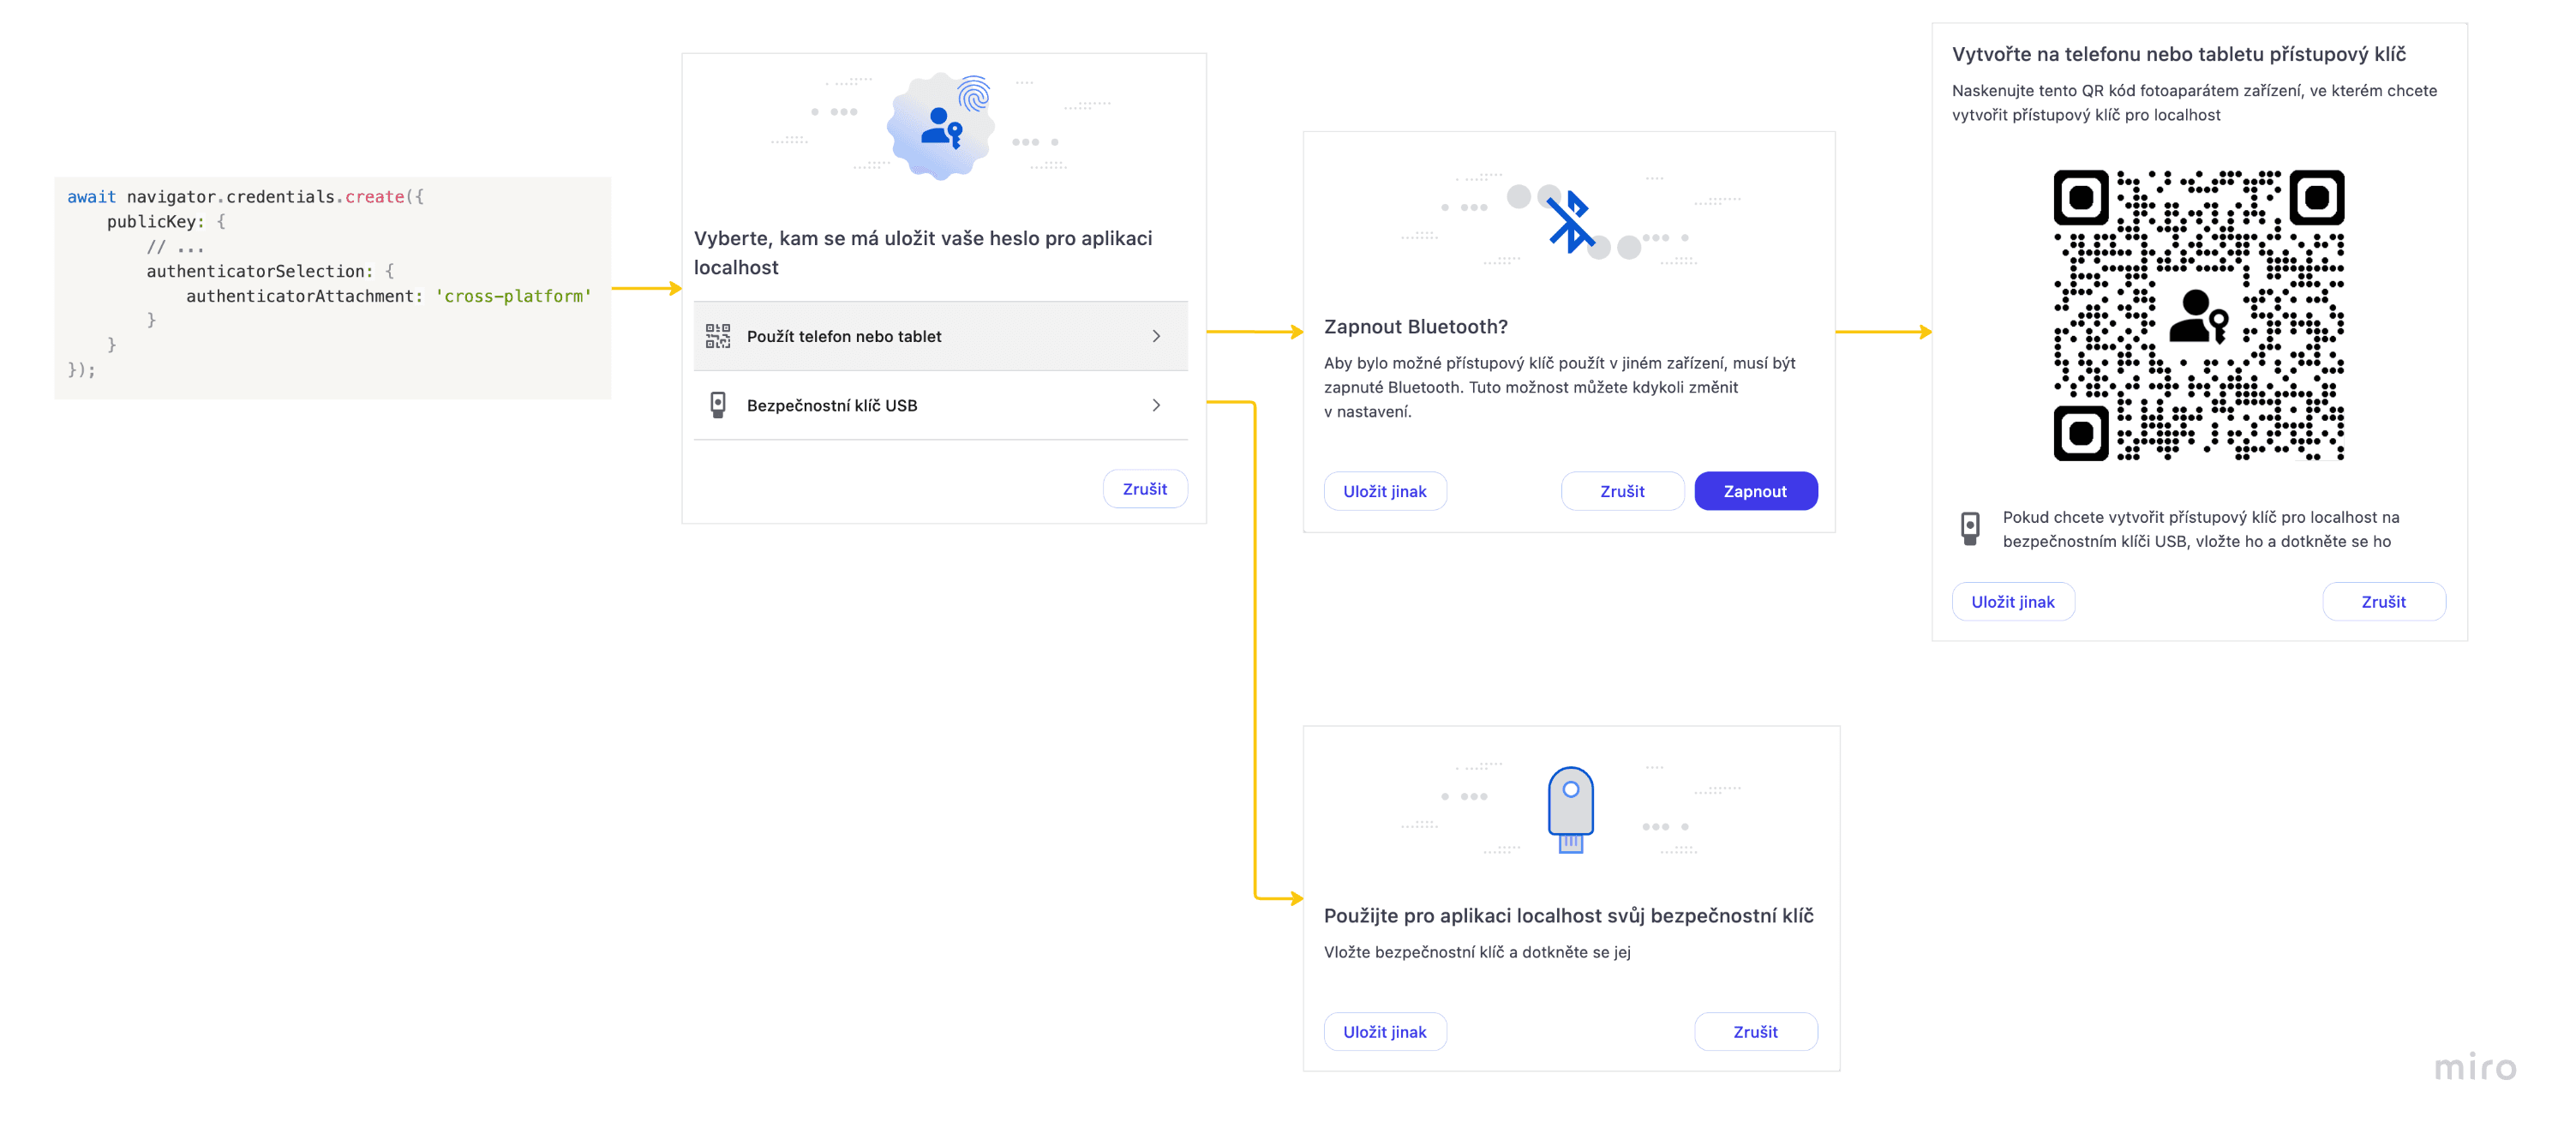
Roaming (cross-platform) authenticators: Connectable via USB, Bluetooth, NFC, or a combination of these.
WebAuthn API:
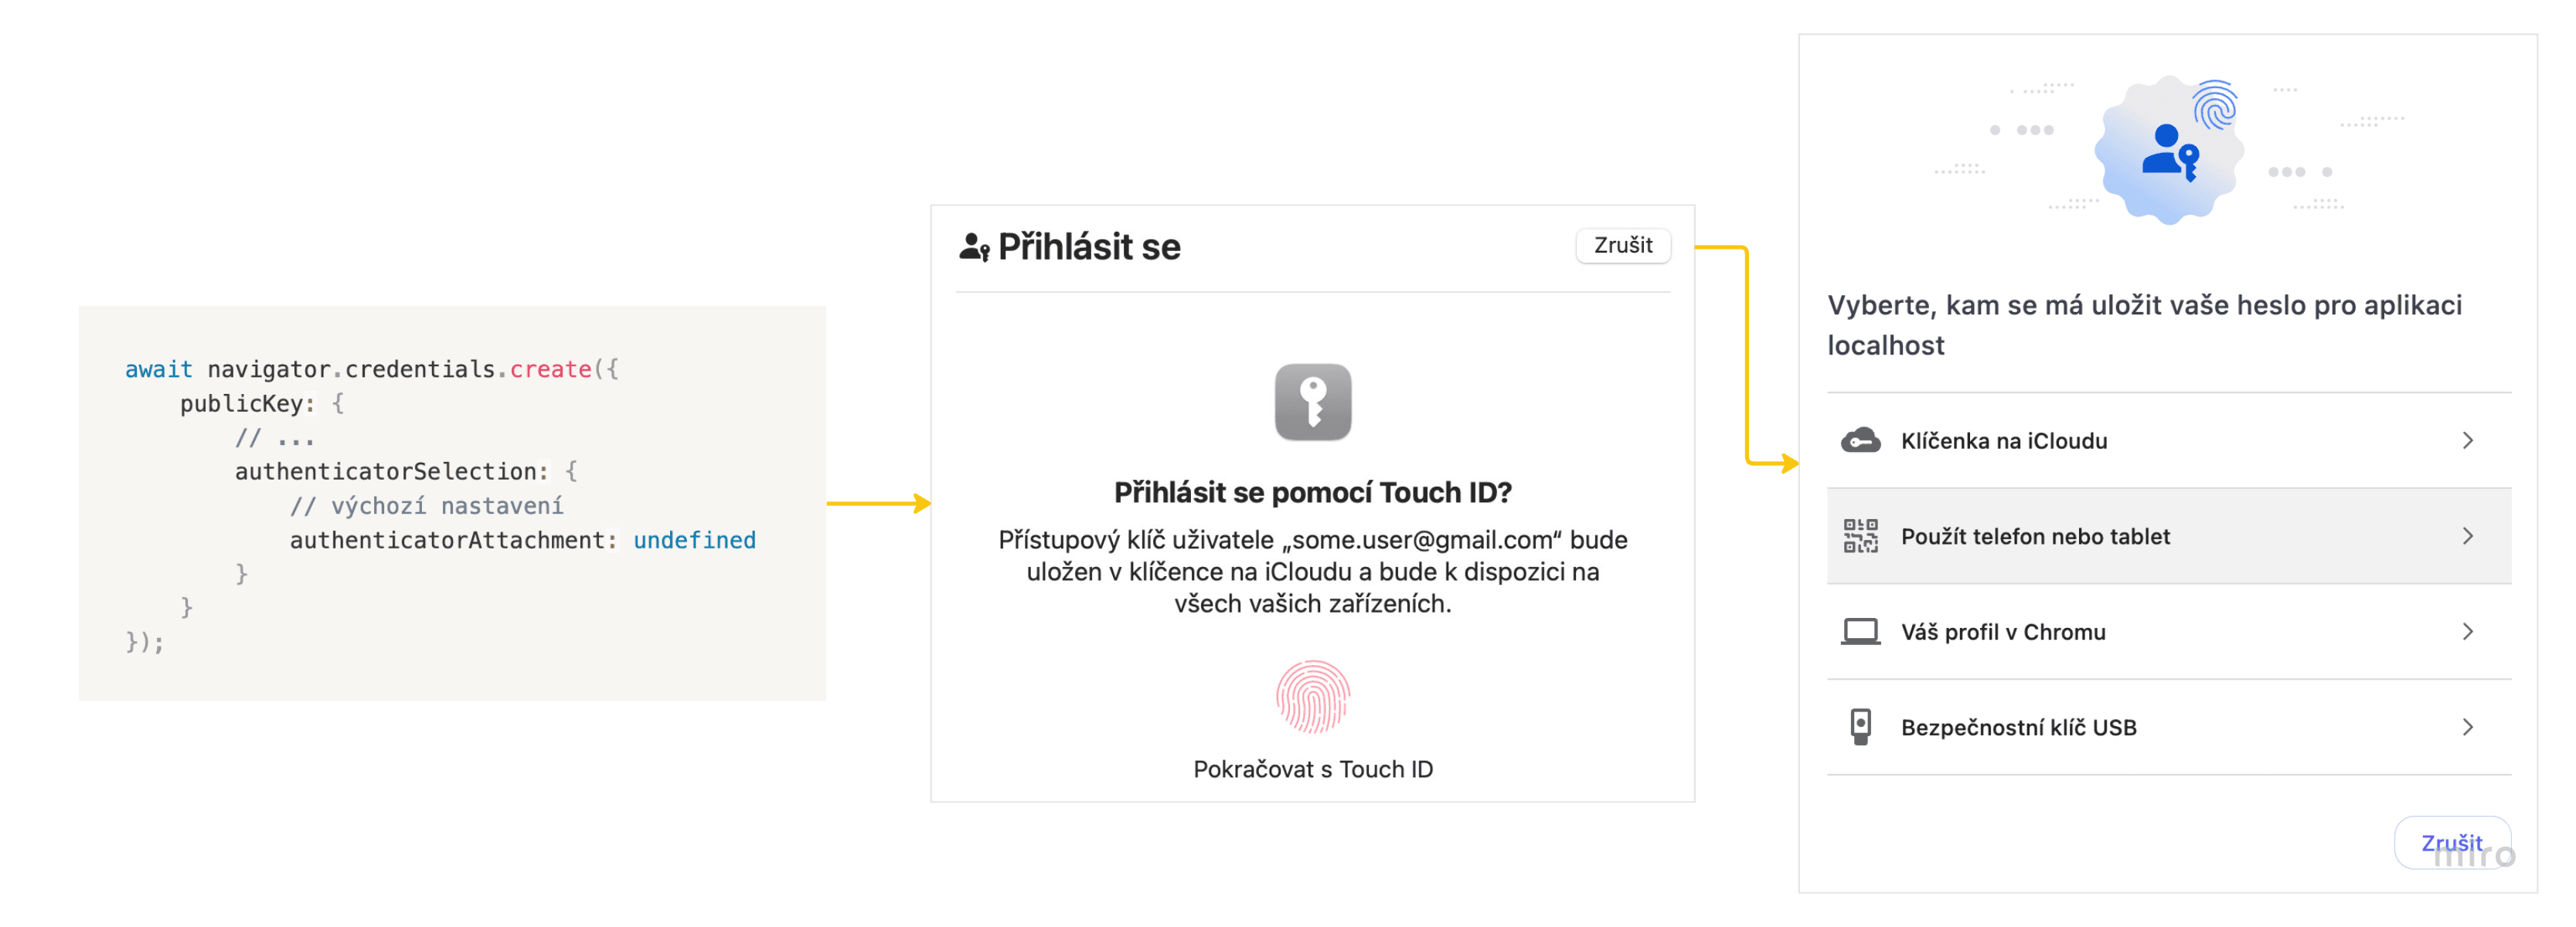
**Platform authenticator:**Platform authenticator**Roaming (cross-platform) authenticator:**Roaming (cross-platform) authenticator**Without a specified type:**Without a specified typeThe specific UI may differ depending on the operating system and browser. Here are examples from Mac OS, Chromium.
2. Dividing authenticators by storage capability
Non-discoverable credentials:
Older versions of authenticators didn't support storing the private part of the passkey. Such an authenticator encrypted the private part of the passkey and the resulting ciphertext corresponded to the ID value of the given passkey.
During login it was always necessary to know the username, by which the relying party server obtained from the database a list of all the user's existing passkeys and sent them during login in allowCredentials. The authenticator then decrypted the given passkey ID using its private key to obtain the private part of the passkey and perform authentication.
Such a passkey type used to be called non-resident keys, now non-discoverable credentials (in the official specification also server-side credentials).
Discoverable credentials:
By contrast, today probably most modern authenticators support storing the private part of the passkey directly in the authenticator. During login it's not necessary to provide a list of the user's created passkeys (allowCredentials can be empty), and therefore not to obtain the username either. The given authenticator offers all available passkeys, which the browser displays and the user simply chooses. Such passkeys used to be called resident keys, today discoverable credentials.
For created passkeys to be discoverable, you have to set residentKey: "required" when creating them:
'required': The authenticator must create a discoverable credential. If it doesn't support that, it throws an error.
'preferred': A discoverable credential will be created only if the authenticator supports it, otherwise a non-discoverable credential will be created.
'discouraged': And vice versa.
From here on I'll focus only on discoverable credentials, because I consider them more user-friendly: no username during login, and potentially safer: see the chapter below Security risks & user privacy.
💡
What is user presence & user verification?
The most basic form of user verification is so-called user presence (UP flag) – the user simply presses a button on their authenticator, e.g. on a USB security key, and thereby confirms their presence. By contrast, user verification (UV flag) requires verifying the user, according to the authenticator's capability: i.e. PIN, fingerprint, gesture, etc. Thanks to this the relying party server can determine whether it's the same user, but not determine the exact identification of the user.
**The given authenticator encodes the UP and UV results, together [with other boolean values](https://www.w3.org/TR/webauthn-3/#authdata-flags) (_flags_), into _[Authenticator Data](https://developer.mozilla.org/en-US/docs/Web/API/Web_Authentication_API/Authenticator_data)._** **The _relying party_ server then goes through these _flags_ and determines whether the user was verified or not**: [the complete list of verification conditions for](https://www.w3.org/TR/webauthn-3/#sctn-verifying-assertion) _[assertion ceremony](https://www.w3.org/TR/webauthn-2/#sctn-verifying-assertion)._ **From the client's (_relying party_) point of view, i.e. the parameters sent into the `get` and `create` methods, you can only express a wish for how strongly the authenticator should require verifying the user:** `userVerification: UserVerificationRequirement` - `required`: The _relying party_ requires UV and marks it; if the user doesn't prove themselves, the operation fails. - `preferred` (default): The _relying party_ prefers to perform UV. But the operation doesn't fail if it isn't possible. - `discourage`: The _relying party_ prefers to skip UV. A deeper analysis can be found at [web.dev – userVerification deep dive](https://web.dev/articles/webauthn-user-verification) or directly in the [official WebAuthn specification](https://www.w3.org/TR/webauthn-3/#authdata-flags). ### How many factors is authentication with passkeys? All [WebAuthn authenticators meet the category](https://www.w3.org/TR/webauthn/#sctn-authentication-factor-capability) _something you have_. If they additionally support _user verification,_ they are multi-factor authenticators. So authenticators supporting a PIN meet the factor _something you know_, and biometric authenticators _something you are_.
Syncing & deleting passkeys
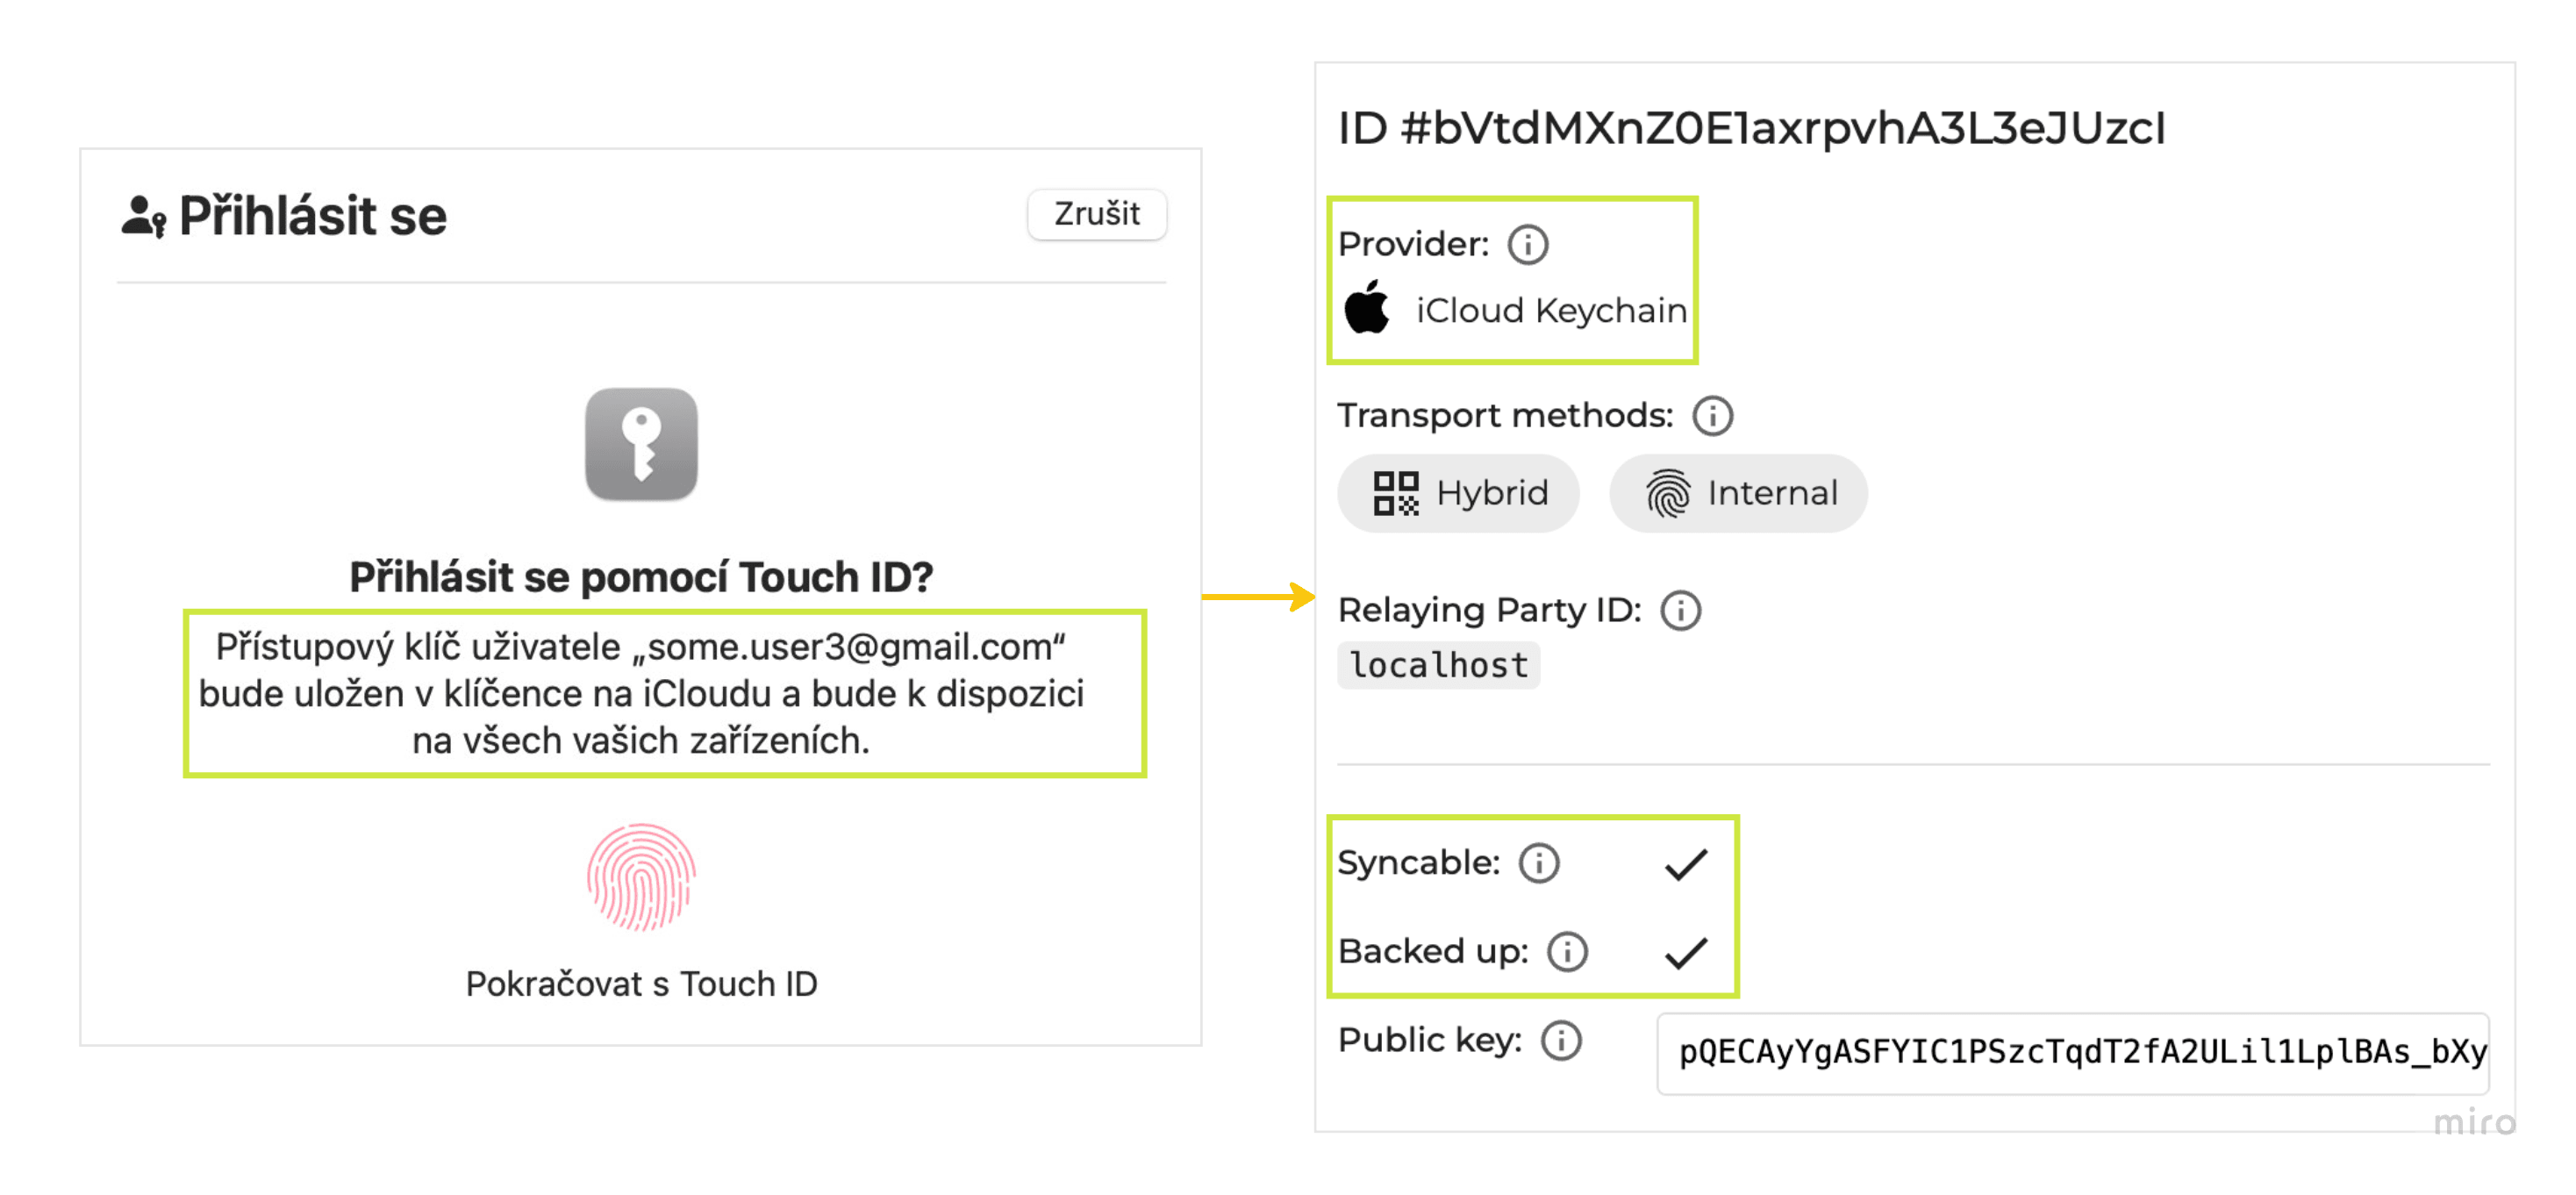
At the beginning, in the description of creating a passkey, I wrote that the private key stays safely stored in the authenticator. After experience with passkeys, this statement doesn't seem very true. After all, already within the demo you could have noticed that if you create a new passkey, you're offered to save it into the iCloud keychain and its alternatives on other OSes or browsers:
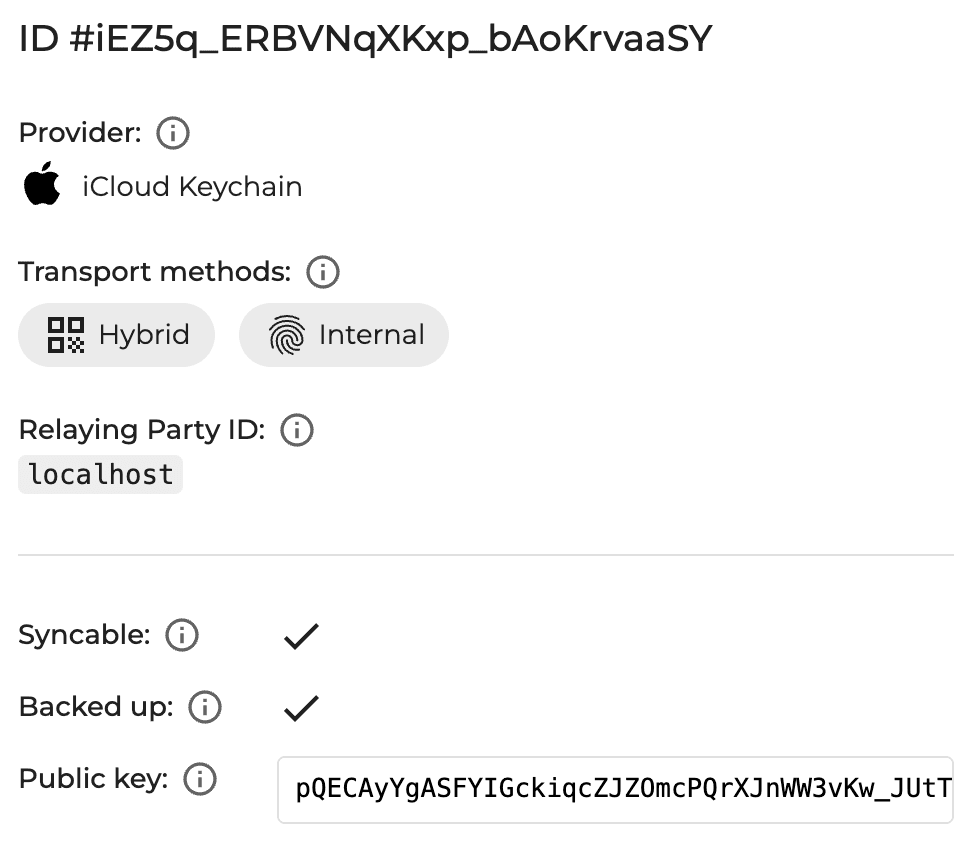
Saving a passkey to the iCloud keychain.By contrast, if you chose to save it e.g. directly in the browser:Saving a passkey only on the device where it was created.Depending on whether it's possible to transfer, or back up, the private part, we divide passkeys into: 1. **_Synced passkey_: a public-key credential whose private key can be transferred outside the device of origin.** If you use Touch ID, Face ID, it will always be a _synced passkey_. It's a compromise between security and usability, but it's precisely thanks to this that WebAuthn is being widely adopted. In the [demo](https://with-webauthn.dev) you'll then see it as:2. **_Device-bound passkey_: a public-key credential whose private key stays stored in the device of origin.** This is a safer way of using WebAuthn than a _synced passkey_, but it can't be recovered if the authenticator is lost. In the [demo](https://with-webauthn.dev) you'll see it as:In the official WebAuthn specification we read: > "[Public Key Credential Sources](https://www.w3.org/TR/webauthn-3/#public-key-credential-source) may be backed up in some fashion such that they may become present on an authenticator other than their [generating authenticator](https://www.w3.org/TR/webauthn-3/#generating-authenticator). Backup can occur via mechanisms including but not limited to peer-to-peer sync, cloud sync, local network sync, and manual import/export." > – [w3.org](https://www.w3.org/TR/webauthn-3/#backed-up) > "This specification defines no protocol for backing up [credential private keys](https://www.w3.org/TR/webauthn-2/#credential-private-key), or for sharing them between [authenticators](https://www.w3.org/TR/webauthn-2/#authenticator). In general, it is expected that a [credential private key](https://www.w3.org/TR/webauthn-2/#credential-private-key) never leaves the [authenticator](https://www.w3.org/TR/webauthn-2/#authenticator) that created it." > – [w3.org](https://www.w3.org/TR/webauthn-3/#sctn-credential-loss-key-mobility) **WebAuthn 3, newly compared to WebAuthn 2, [offers the option to transfer the private key](https://www.w3.org/TR/webauthn-3/#backed-up) (or the whole [_credential public key source_](https://www.w3.org/TR/webauthn-3/#public-key-credential-source)) outside the device of origin, but no longer specifies how this should happen.** If you previously lost the given authenticator, all passkeys were lost for good. This could be prevented by registering multiple authenticators. But creating such backups isn't very user-friendly. This problem is now solved precisely thanks to _synced passkeys,_ which are typically stored in various cloud keychains, depending on which platform you use – the iCloud keychain, [Google Password Manager](https://blog.google/technology/safety-security/google-password-manager-passkeys-update-september-2024) and [reportedly soon](https://blogs.windows.com/windowsdeveloper/2024/10/08/passkeys-on-windows-authenticate-seamlessly-with-passkey-providers) also Windows Hello. **Is it safe?** [Within the Apple ecosystem](https://support.apple.com/en-us/102195): - The private key is transferred to the cloud over an end-to-end encrypted channel. - [AES cipher with a key length of 256 bits (since iOS 12)](https://support.apple.com/en-afri/guide/iphone/iph82d6721b2/12.0/ios/12.0) is used for transfer and storage. - To store it in iCloud, you must have two-factor verification set up on your Apple account. If you don't like the option of moving passkeys to the cloud, there's still the option of getting a physical security key and thus keeping full control over the storage location.
💡
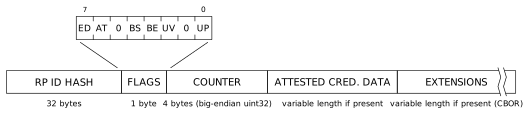
How do we tell synced from device-bound passkeys? The procedure is similar to obtaining the _user presence_ _(UP)_ and _user verification (UV)_ _[flags](https://www.w3.org/TR/webauthn-3/#authdata-flags),_ which I described above within the _assertion ceremony_. Here, instead of the bit at position 0 (corresponding to _UP_) and the bit at position 2 (corresponding to _UV_), we need: The bit at position 3 with the value for the **_Backup Eligibility (BE) flag_**. This value tells us whether it's possible to transfer the passkey source (i.e. [the private key and other data](https://www.w3.org/TR/webauthn-3/#public-key-credential-source)) outside the authenticator where the given private key was generated. - The transfer type doesn't have to be only to the cloud, but also by manual import/export, over a local network or e.g. peer-to-peer synchronization. At least that's what the specification says. - If it's a transferable passkey, we call it a _multi-device credential_, otherwise it's a _single-device credential_. - We obtain this information during the creation of the passkey – the _attestation ceremony._ The bit at position 4: **_Backup State (BS)_:** Has the passkey source already been transferred?Authenticator data (the length of this ArrayBuffer is variable, see https://www.w3.org/TR/webauthn-3/#fig-authData)The complete parsing of authenticator data can be done by the already-mentioned [SimpleWebAuthn](https://simplewebauthn.dev/docs/packages/server). The client just sends the response from the authenticator to the server, where it calls:
For enthusiasts of bit manipulation, the CBOR format and knowledge of other low-level concepts, I'm attaching this library's function for parsing authenticator data – [parseAuthenticatorData.ts](https://github.com/MasterKale/SimpleWebAuthn/blob/master/packages/server/src/helpers/parseAuthenticatorData.ts).
🧑💻
Source code [Using the `verifyRegistrationResponse` method in the demo.](https://github.com/cermakjiri/with-webauthn/blob/452b5aa4b0377b60ebd89b28cc9f990af75be51c/examples/webauthn-default/src/pages/api/webauthn/register/verify.ts#L29)
Can WebAuthn provide us with cryptographic proof of the authenticator's origin, and thus what is and isn't attestation? How to tell on which authenticator a passkey was created? 👇
💡
What is attestation and how does it relate to AAGUID? **Authenticator Attestation Globally Unique Identifier (AAGUID)** is a 128-bit identifier of the type (i.e. brand, model) of the authenticator. It's chosen by the manufacturer and should be unique across all authenticators. WebAuthn *attestation* is proof that the authenticator really comes from the given manufacturer. We can cryptographically verify this proof thanks to the so-called _chain of trust_ and can **therefore safely claim whether the signature comes from a certificate chain started by a so-called root certificate or not.** By default the `create` method **doesn't use this method of verification**. It's therefore appropriate to adjust _`attestationType`_:
[SimpleWebAuthn](https://simplewebauthn.dev/docs/packages/server) can do this for us (if `attestationType: 'direct'`) and, based on `fmt` (_attestation statement format_), automatically [selects the corresponding root certificate](https://github.com/MasterKale/SimpleWebAuthn/blob/master/packages/server/src/registration/verifyRegistrationResponse.ts#L247). For more advanced use it also offers the `SettingsService` class with which you can set your own root certificate or verify the currently used one. The default root certificates it uses can be found [here](https://github.com/MasterKale/SimpleWebAuthn/tree/master/packages/server/src/services/defaultRootCerts), which you can compare with the official [root certificate of e.g. Apple](https://www.apple.com/certificateauthority/Apple_WebAuthn_Root_CA.pem). The [passkey-authenticator-aaguids](https://github.com/passkeydeveloper/passkey-authenticator-aaguids) project aggregates a file of all available authenticators (name, logo, etc.), which can come in handy when creating the UI of a user's registered passkeys. **Important notes:** - **Some platforms that implemented _synced passkeys_ don't support _attestation._** So even if you set `attestationType: 'direct'`, the authenticator returns you a result where `fmt` is `null`. - This currently applies to [Apple](https://www.slashid.dev/blog/passkeys-deepdive/): > Attestation statements are intended to attest to the security properties of the device where the credential lives, as the spec was written with device-bound credentials in mind. In a world where the credential can sync to devices with different security properties, a one-shot attestation during registration can't provide any meaningful promises about all of the devices where the passkey can be used. > – [forums.developer.apple.com](https://forums.developer.apple.com/forums/thread/713195) - Also for Android: > Passkeys on Android and Apple platforms don't support attestation as of March 2024. > – [web.dev](https://web.dev/articles/webauthn-aaguid) - Currently, Windows Hello [reportedly](https://www.corbado.com/blog/device-bound-synced-passkeys#312-technical-details-of-device-bound-passkeys) supports only _device-bound passkeys_, and thus also _attestation_ (Windows 11). [Looking ahead, however, it plans to implement _synced passkeys_](https://blogs.windows.com/windowsdeveloper/2024/10/08/passkeys-on-windows-authenticate-seamlessly-with-passkey-providers/) and the user should then have the option to choose.
How to delete a passkey?
The WebAuthn API offers the create and get methods, but what about delete? Currently there's nothing like that available.
A passkey consists of a public part, stored in our application's database, and a private part, stored in the cloud, the authenticator or other places. From our application's point of view, we can delete this public part from the database and limit the offered passkeys during login using the allowCredentials parameter. Furthermore, we can illustrate to the user (depending on the platform, or AAGUID) how they can remove the private part, see How to Delete a Passkey on Apple, Windows and Android.
Will it get better? This shortcoming is targeted by the WebAuthn Signal API from the new version of the WebAuthn specification.
So what's it about? The goal is for relying parties to be able to report information about revoked or simply incorrect passkeys (e.g. when the username changes). This communication is to be available through new methods:
Source: w3c.github.ioIt's music of the future, we'll see how near. Currently you can try it in Chrome Canary, see the [official demo](https://signal-api-demo.glitch.me/index.html).
Let's imagine a situation: we have login with a classic username and password. At the same time, some users have login via passkey set up. An attacker tries various usernames; the relying party server returns existing passkeys (i.e. their IDs and transport method) in the allowCredentials argument, or throws an error if no passkeys exist for the given account. In both cases, the attacker can detect which accounts are unprotected by WebAuthn and thus may be weaker to break.
How to defend against this?
A solution can be, for example, to always fill allowCredentials, whether with real or pseudo-random values deterministically derived from the username. Nothing changes for the user; the authenticator offers only valid passkeys. Another option is to use exclusively discoverable credentials and thus set allowCredentials: [], which at the same time also prevents potential de-anonymization via passkey IDs.
It may also be better not to return specific errors from the server that hint to the attacker (yes, it's a balance between UX and security).
Source: w3c.github.io
Detecting existing accounts
In case an email is used as the username when registering a user, and to prevent a situation where an attacker can find out whether a given email has a created user account, it may be appropriate to first send a one-time code to the given email address. This verifies that the user really owns it and only then continue with creating the passkey.
Source: w3c.github.io
You can find more about the security and privacy of passkeys in the official WebAuthn specification.
Is it worth going for it?
Even if it's probably not evident from this article, I'm personally really excited about this technology. After a long time, I see a web technology that can really improve a product for end users and, with correct implementation, significantly improve security as well as simplify authentication.
If you still don't believe passkeys can improve your product:
Online WebAuthn debugger: passkeys-debugger.io, or debugger.simplewebauthn.dev
At the same time, please bear in mind that this is a very dynamically developing technology. So despite the effort to describe everything as precisely as possible, some information may soon become outdated.
Thank you for your attention, I'll be glad for your opinion. If you don't want to miss my other posts, not only about passkeys and WebAuthn, follow me on LinkedIn (no spam – my activity is proof of that).
Jirka likes to do things properly, and when his head starts spinning from it, he goes climbing on the wall. He loves trails through nature, jazz and books.


 🧑💻Source code
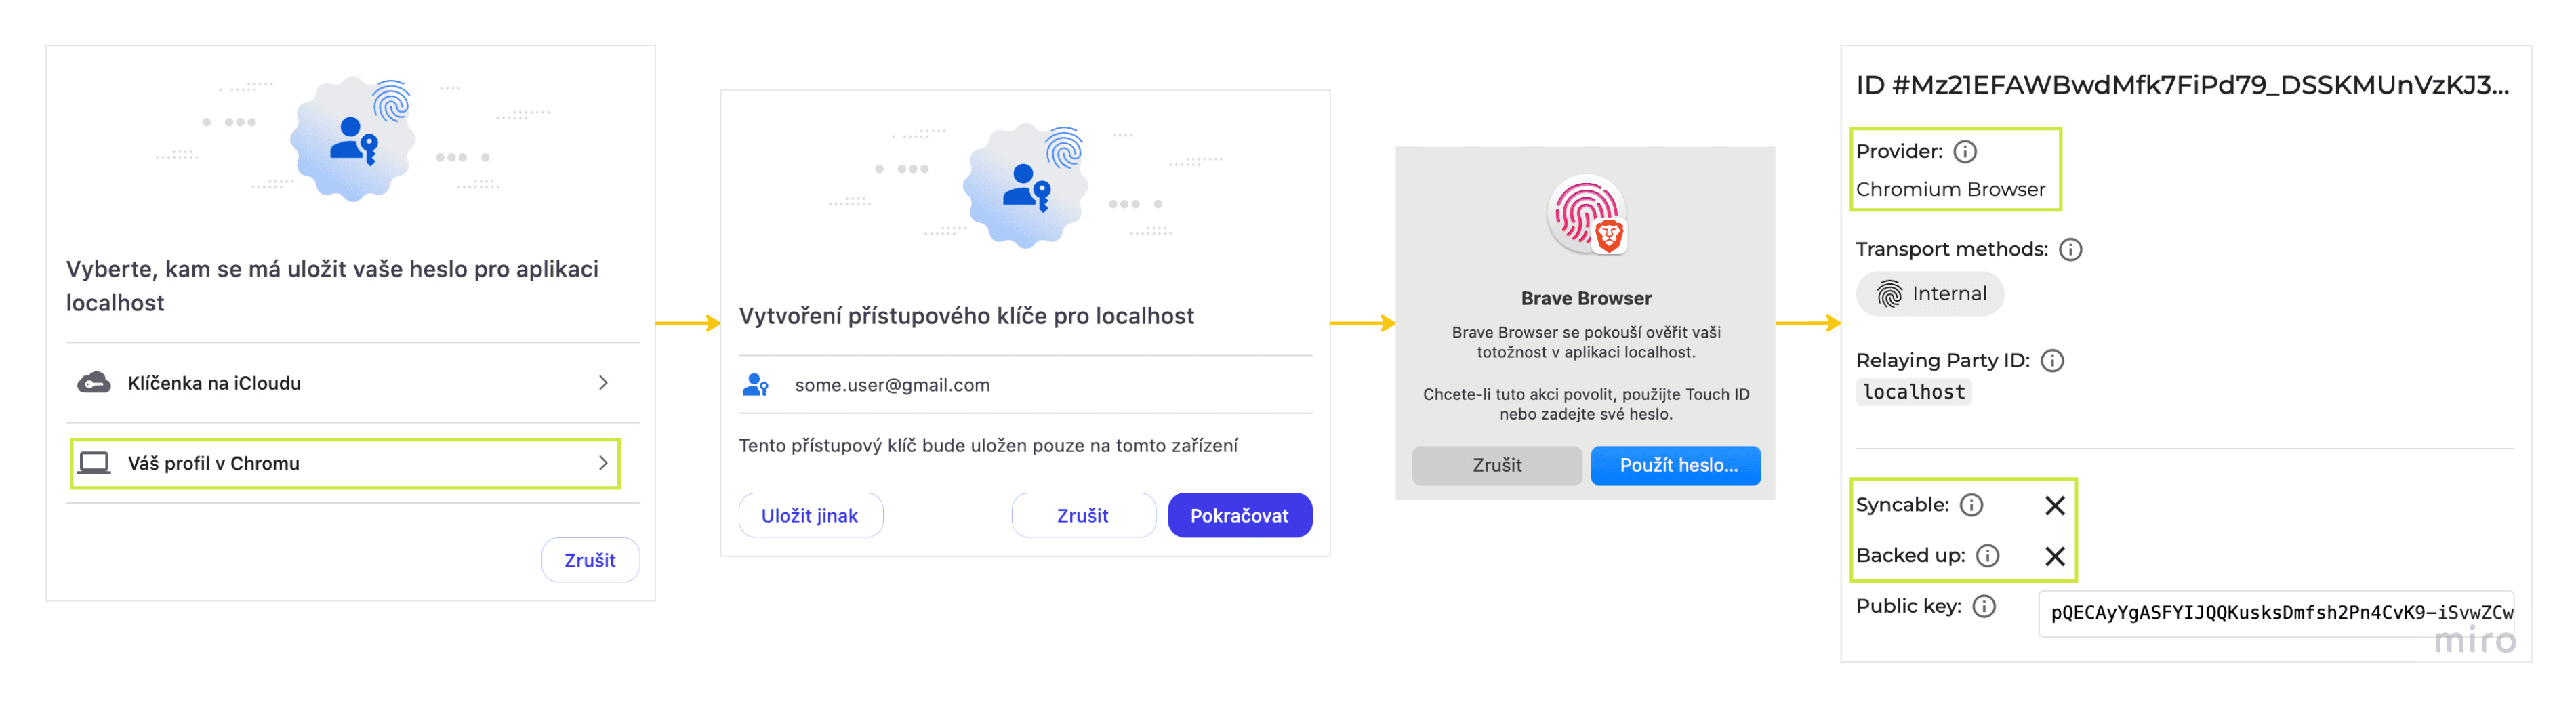
 2. **_Device-bound passkey_: a public-key credential whose private key stays stored in the device of origin.** This is a safer way of using WebAuthn than a _synced passkey_, but it can't be recovered if the authenticator is lost. In the [demo](https://with-webauthn.dev) you'll see it as:
 In the official WebAuthn specification we read: > "[Public Key Credential Sources](https://www.w3.org/TR/webauthn-3/#public-key-credential-source) may be backed up in some fashion such that they may become present on an authenticator other than their [generating authenticator](https://www.w3.org/TR/webauthn-3/#generating-authenticator). Backup can occur via mechanisms including but not limited to peer-to-peer sync, cloud sync, local network sync, and manual import/export." > – [w3.org](https://www.w3.org/TR/webauthn-3/#backed-up) > "This specification defines no protocol for backing up [credential private keys](https://www.w3.org/TR/webauthn-2/#credential-private-key), or for sharing them between [authenticators](https://www.w3.org/TR/webauthn-2/#authenticator). In general, it is expected that a [credential private key](https://www.w3.org/TR/webauthn-2/#credential-private-key) never leaves the [authenticator](https://www.w3.org/TR/webauthn-2/#authenticator) that created it." > – [w3.org](https://www.w3.org/TR/webauthn-3/#sctn-credential-loss-key-mobility) **WebAuthn 3, newly compared to WebAuthn 2, [offers the option to transfer the private key](https://www.w3.org/TR/webauthn-3/#backed-up) (or the whole [_credential public key source_](https://www.w3.org/TR/webauthn-3/#public-key-credential-source)) outside the device of origin, but no longer specifies how this should happen.** If you previously lost the given authenticator, all passkeys were lost for good. This could be prevented by registering multiple authenticators. But creating such backups isn't very user-friendly. This problem is now solved precisely thanks to _synced passkeys,_ which are typically stored in various cloud keychains, depending on which platform you use – the iCloud keychain, [Google Password Manager](https://blog.google/technology/safety-security/google-password-manager-passkeys-update-september-2024) and [reportedly soon](https://blogs.windows.com/windowsdeveloper/2024/10/08/passkeys-on-windows-authenticate-seamlessly-with-passkey-providers) also Windows Hello. **Is it safe?** [Within the Apple ecosystem](https://support.apple.com/en-us/102195): - The private key is transferred to the cloud over an end-to-end encrypted channel. - [AES cipher with a key length of 256 bits (since iOS 12)](https://support.apple.com/en-afri/guide/iphone/iph82d6721b2/12.0/ios/12.0) is used for transfer and storage. - To store it in iCloud, you must have two-factor verification set up on your Apple account. If you don't like the option of moving passkeys to the cloud, there's still the option of getting a physical security key and thus keeping full control over the storage location.